Laravel creates rest API with passport refresh token example, Here you will learn how to create restful api with laravel passport refresh token example.
This example tutorial will guide you step by step on how to create rest API with passport refresh token in laravel. And also learn how to set passport token expired time in this example and also get access token in laravel apps.
Also, get laravel passport refresh personal access token, when any user register or login user by it’s valid auth credentials in your laravel apps.
Laravel Create REST API with Passport Refresh Token Example Tutorial
Follow the below steps and laravel api authentication and token with passport refresh token laravel apps:
- Step 1: Download Laravel New App
- Step2: Add Database Detail
- Step 3: Install Passport Packages in Laravel
- Step 4: Run Migration and Install Passport Auth
- Step 5: Configuration Passport Package
- Step 6: Create APIs Route
- Step 7: Create Controller & Methods
- Step 8: Now Test Laravel REST API in Postman
Step 1: Download Laravel New App
First of all, open your terminal and run the following command to download laravel fresh setup for laravel passport refresh personal access token app:
composer create-project --prefer-dist laravel/laravel blog
Step 2: Add Database Detail
Next step, Go to your laravel refresh token api app and open .env file. Then set up database credential as follow:
 DB_CONNECTION=mysql
 DB_HOST=127.0.0.1
 DB_PORT=3306
 DB_DATABASE=here your database name here
 DB_USERNAME=here database username here
 DB_PASSWORD=here database password here
Step 3: Install Passport Package In Laravel
In this step, you need to run the following commands:
composer require laravel/passport

composer require guzzlehttp/guzzle

composer require symfony/psr-http-message-bridge
After successfully install laravel passport, register providers. Open config/app.php. So update the following code into config/app.php file:
  // config/app.php

'providers' =>[
 Laravel\Passport\PassportServiceProvider::class,
 ],
Before you run migration command, go to the app/providers/AppServiceProvider.php and put the two line of code inside a boot method :
 Use Schema;
 public function boot() {
 Schema::defaultStringLength(191);
 }
Step 4: Run Migration and Install Passport Auth
Now, open your terminal and run the following migration command. This command creates tables in the database :
php artisan migrate
Next, generate a passport encryption key. So runt the following command. This command will create the encryption keys needed to generate secure access tokens. like secret key and secret id.
php artisan passport:install
Step 5: Configuration Passport Package
Configure installed passport package. So navigate App/User.php file and update the following code into your App/User.php file:
Next Register passport package in AuthServiceProvider.php So Navigate to App/Providers/ and open AuthServiceProvider.php. Then update the following lines of code in this file as follow:
<?php
namespace App\Providers;
use Illuminate\Foundation\Support\Providers\AuthServiceProvider as ServiceProvider;
use Illuminate\Support\Facades\Gate;
use Laravel\Passport\Passport;
use Carbon\Carbon;
class AuthServiceProvider extends ServiceProvider
{
/**
* The policy mappings for the application.
*
* @var array
*/
protected $policies = [
// 'App\Model' => 'App\Policies\ModelPolicy',
];
/**
* Register any authentication / authorization services.
*
* @return void
*/
public function boot()
{
$this->registerPolicies();
Passport::routes();
Passport::tokensExpireIn(Carbon::now()->addDays(1));
Passport::refreshTokensExpireIn(Carbon::now()->addDays(10));
}
}
config/auth.php
Next, go to config/auth.php and Change the API driver to the session to passport. Put this code ‘driver’ => ‘passport’, in API :
     [
         'web' => [
             'driver' => 'session',
             'provider' => 'users',
         ],
         'api' => [
             'driver' => 'passport',
             'provider' => 'users',
         ],
     ],
Step 6: Create APIs Route
In this step, you need to create rest API routes. So navigate routes/api.php. And update the following routes into api.php file:
Route::prefix('v1')->group(function(){
Route::post('login', 'Api\AuthController@login');
Route::post('register', 'Api\AuthController@register');
});
Step 7: Create Controller & Methods
Run the below command and create a controller:
php artisan make:controller Api\AuthController
After that, update the following methods into AuthController as follow:
<?php
namespace App\Http\Controllers;
use App\User;
use Validator;
use Exception;
use GuzzleHttp\Client;
use Illuminate\Http\Request;
use Illuminate\Support\Facades\Auth;
use Laravel\Passport\Client as OClient;
class AuthController extends Controller
{
public $successStatus = 200;
public function login() {
if (Auth::attempt(['email' => request('email'), 'password' => request('password')])) {
$oClient = OClient::where('password_client', 1)->first();
return $this->getTokenAndRefreshToken($oClient, request('email'), request('password'));
}
else {
return response()->json(['error'=>'Unauthorised'], 401);
}
}
public function register(Request $request) {
$validator = Validator::make($request->all(), [
'name' => 'required',
'email' => 'required|email|unique:users',
'password' => 'required',
'c_password' => 'required|same:password',
]);
if ($validator->fails()) {
return response()->json(['error'=>$validator->errors()], 401);
}
$password = $request->password;
$input = $request->all();
$input['password'] = bcrypt($input['password']);
$user = User::create($input);
$oClient = OClient::where('password_client', 1)->first();
return $this->getTokenAndRefreshToken($oClient, $user->email, $password);
}
public function getTokenAndRefreshToken(OClient $oClient, $email, $password) {
$oClient = OClient::where('password_client', 1)->first();
$http = new Client;
$response = $http->request('POST', 'http://mylemp-nginx/oauth/token', [
'form_params' => [
'grant_type' => 'password',
'client_id' => $oClient->id,
'client_secret' => $oClient->secret,
'username' => $email,
'password' => $password,
'scope' => '*',
],
]);
$result = json_decode((string) $response->getBody(), true);
return response()->json($result, $this->successStatus);
}
}
In the above controller, getTokenAndRefreshToken() method will generate passport token and refresh token for your laravel apps.
Now, Open your terminal and run the following command to start the development server:
php artisan serve
Step 8: Now Test Laravel REST API in Postman
Laravel Register Rest API :
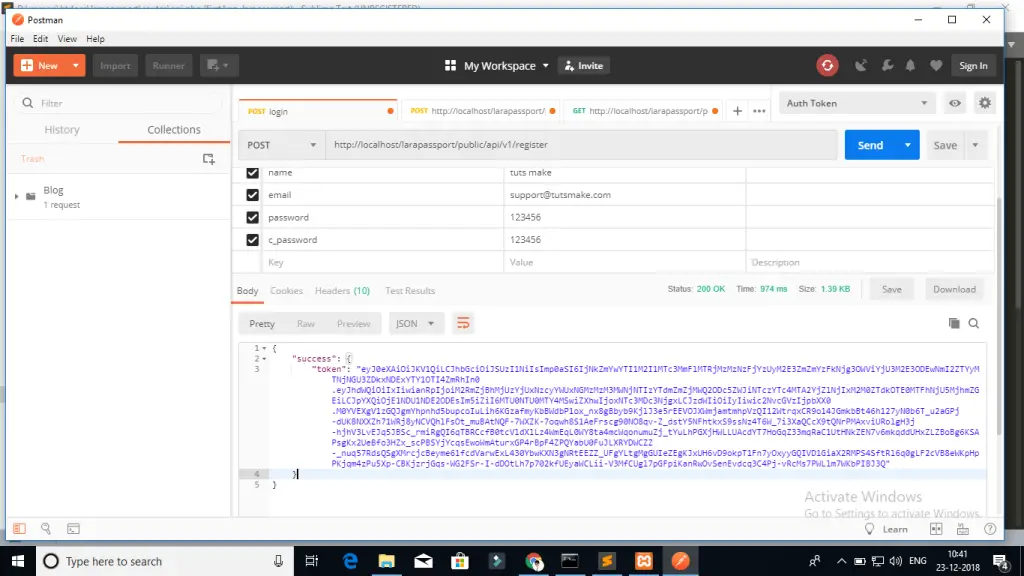
laravel register api
Login API :
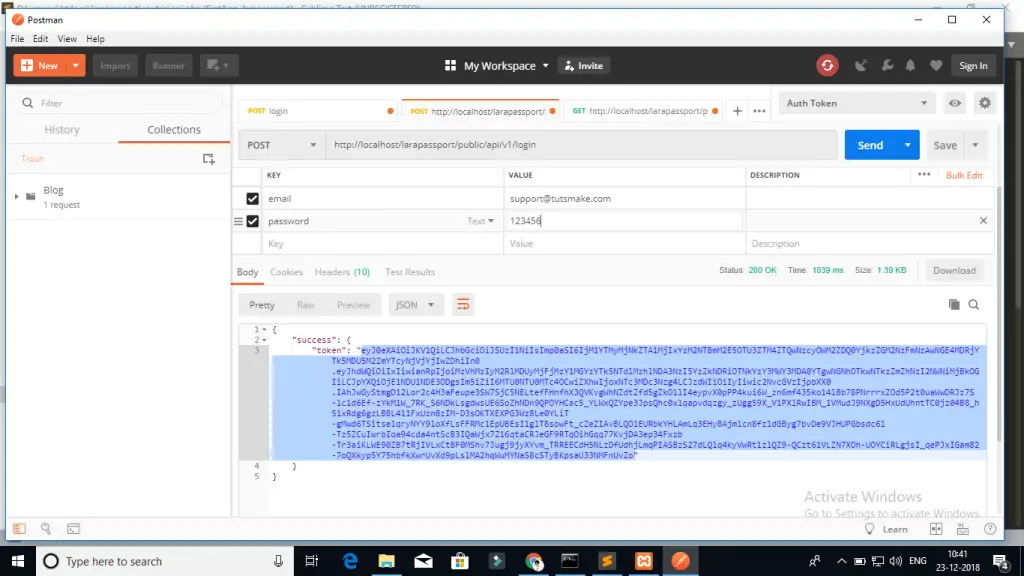
laravel passport login api
Conclusion
In this laravel passport API with refresh token example. In this tutorial, you have learned many things like how to install a laravel passport authentication package and configuration passport package in laravel application, How to create restful APIs with passport package, and how to generate a refresh token with a passport in laravel.
If you have any questions or thoughts to share, use the comment form below to reach us.