
Laravel 6 CKEditor. How to install and use CKEditor with image upload in laravel. In this tutorial, we will learn how to install CKEditor in laravel using the command line. and how to upload images and files in laravel with CKEditor.
How to Install CKEditor Image Upload in Laravel
- Install Laravel
- Install CKEditor Package in Laravel
- Register CKEditor package in Laravel
- Publish the Ckeditor package by command
- Create Route
- Generate Controller
- Create Blade View
- Upload and Insert Image in laravel using CKEditor
1. Install Laravel
First We need Download fresh latest Laravel setup. So we will use the below given command for installing the fresh new step of laravel.
composer create-project --prefer-dist laravel/laravel Blog
2. Install CKEditor In Laravel
Next, to install CKEditor in Laravel, open the command prompt in your project root directory and run the below command.
composer require unisharp/laravel-ckeditor
Above command will install CKEditor packages in your project’s vendor directory.
3. Register CKEditor package in Laravel
Next step, we need to registered the package in laravel. So, open your config/app.php and place the below line to the providers array.
Unisharp\Ckeditor\ServiceProvider::class,
4. Publish the Ckeditor package by command
After the successffully run the below given command, which copies some of the files and folders from ‘vendor\unisharp\laravel-ckeditor’ to ‘public\vendor\unisharp\laravel-ckeditor’.
php artisan vendor:publish --tag=ckeditor
5. Create Route
In this step, we need to create one route. Now go to route/web.php file and put the below code into your file:
Route::get('/ckeditor', 'CkeditorController@index');
6. Generate Controller
In this step, we will generate a controller by command line. So open your command line and run the below-given command on your command prompt.
cd your project root directory
//run the command

php artisan make:controller CkeditorController
After successfully run the above command and create a controller file. Next open your controller and put the below code into your file.
<?php
namespace App\Http\Controllers;
use Illuminate\Http\Request;
use Validator,Redirect,Response;
class CkeditorController extends Controller
{
public function index()
{
return view('ckeditor');
}
}
7. Create Blade View
Final step, in this step, we need to go resource/views and create one file name ckeditor.blade.php.
After we will create a blade view file, you need to put the below code into your file.
<!DOCTYPE html>
<html>
<head>
<title>Install and Use CKEditor in Laravel with Image Upload - Tutsmake.com</title>
<meta charset="utf-8">
<meta name="viewport" content="width=device-width, initial-scale=1, shrink-to-fit=no">
<meta name="description" content="">
<meta name="author" content="">
<meta name="csrf-token" content="{{ csrf_token() }}">
<!--Bootsrap 4 CDN-->
<link rel="stylesheet" href="https://stackpath.bootstrapcdn.com/bootstrap/4.1.3/css/bootstrap.min.css" integrity="sha384-MCw98/SFnGE8fJT3GXwEOngsV7Zt27NXFoaoApmYm81iuXoPkFOJwJ8ERdknLPMO" crossorigin="anonymous">
<script src="//cdnjs.cloudflare.com/ajax/libs/jquery/3.2.1/jquery.min.js"></script>
</head>
<body>
<div class="container-fluid">
<textarea class="form-control" id="description" name="description"></textarea>
</div>
<script src="{{ asset('vendor/unisharp/laravel-ckeditor/ckeditor.js') }}"></script>
<script>
CKEDITOR.replace( 'description' );
</script>
</body>
</html>
Note:- If the package of ckeditor is having some problem installing your Laravel web application. Then you add the following cdn file to your blade view file:
<script src="https://cdn.ckeditor.com/4.13.1/standard/ckeditor.js"></script>
8. Upload and Insert Image in laravel using CKEditor
CKEditor by default does not give the option to upload the image from your computer. If someone looking to give this option then read on. It needs to add a route, image upload and some JavaScript code to our application. At first, to enable image upload option you need to call CKEditor in the following way.
<script>
CKEDITOR.replace( 'description', {
filebrowserUploadUrl: "{{route('upload', ['_token' => csrf_token() ])}}",
filebrowserUploadMethod: 'form'
});
</script>
Here for the key filebrowserUploadUrl, we need to pass the route URL and csrf token. We will define this route in the next step. Now if you click on CKEditor’s image icon, the looks like below.
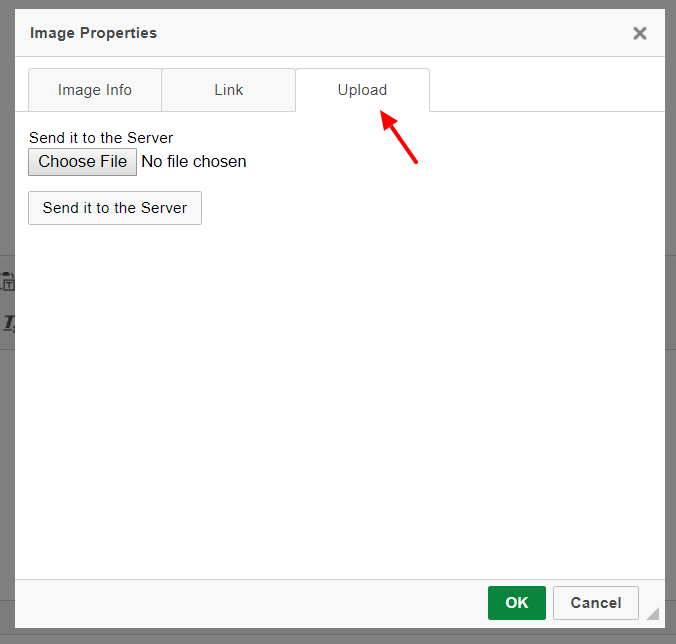
laravel ckeditor image upload
Now we will create a route for upload the image in laravel using CKEditor. Open your route/web.php file and put the below route in your file:
Route::post('ckeditor/image_upload', 'CKEditorController@upload')->name('upload');
To use an image uploaded to CKEditor we need to upload the image to our application folder and send back an image URL. To store an image on a server, we will use the Laravel storage facility where we create a symbol of an on storage folder.
Next, open your terminal and run the below command:
php artisan storage:link
Next, we will put the below method in our controller name CKEditor. This method will store the image or files in the server and return the image URL.
public function upload(Request $request)
{
if($request->hasFile('upload')) {
//get filename with extension
$filenamewithextension = $request->file('upload')->getClientOriginalName();
//get filename without extension
$filename = pathinfo($filenamewithextension, PATHINFO_FILENAME);
//get file extension
$extension = $request->file('upload')->getClientOriginalExtension();
//filename to store
$filenametostore = $filename.'_'.time().'.'.$extension;
//Upload File
$request->file('upload')->storeAs('public/uploads', $filenametostore);
$CKEditorFuncNum = $request->input('CKEditorFuncNum');
$url = asset('storage/uploads/'.$filenametostore);
$msg = 'Image successfully uploaded';
$re = "<script>window.parent.CKEDITOR.tools.callFunction($CKEditorFuncNum, '$url', '$msg')</script>";
// Render HTML output
@header('Content-type: text/html; charset=utf-8');
echo $re;
}
}
Conclusion
How to install and use CKEditor with image upload in laravel. Here we have learned how to install and use CKEditor with image upload in laravel.