In this laravel tutorial, you will learn how to use sweet alert with ajax in laravel apps.
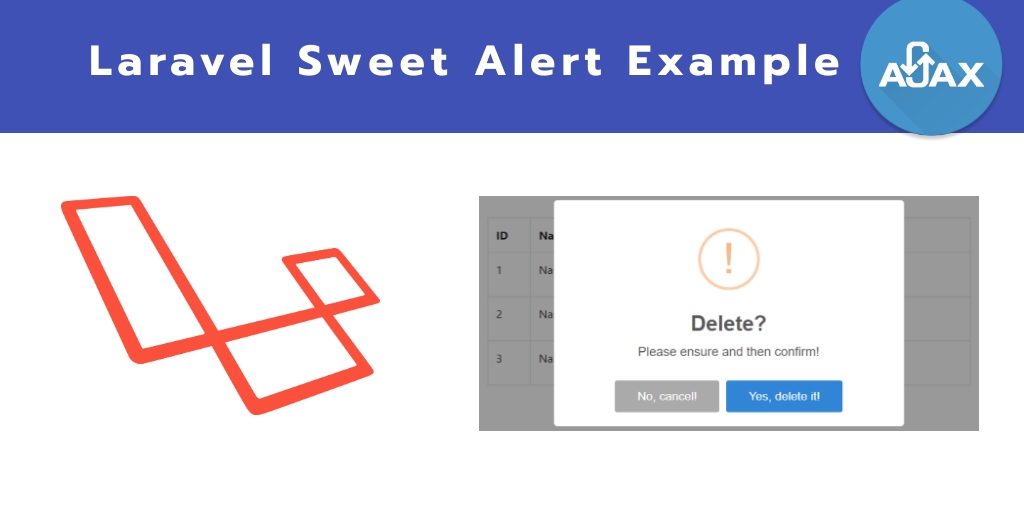
In this tutorial, we will show you one example. Where user lists contain the delete button. when you click the delete button. Then delete confirmation alert appear. After that, if you click “yes delete it”, this row data will be deleted on the database. If you click cancel, the sweet alert message disappears.
This tutorial will guide you step by step on how to use sweet alert with success message, delete message, and warning massage using ajax in laravel apps.
Laravel Sweet Alert with Ajax Example
Follow the below-given steps and use sweet alert for displaying different types of message to users by using ajax in laravel apps:
- Create Methods in Controller
- Add Route
- Use SweetAlert on Blade Views File
- Run Development Server
Step 1: Create Methods in Controller
First of all, create methods on controller file. Then send message with the response as follow:
<?php
namespace App\Http\Controllers;
use Illuminate\Http\Request;
use DB;
use App\User;
class UserController extends Controller
{
public function users()
{
$users = User::all();
return view('users', compact('users'));
}
public function delete($id)
{
$delete = User::where('id', $id)->delete();
// check data deleted or not
if ($delete == 1) {
$success = true;
$message = "User deleted successfully";
} else {
$success = true;
$message = "User not found";
}
// Return response
return response()->json([
'success' => $success,
'message' => $message,
]);
}
}
The above controller contains two methods. First method is users(), which is used to display all users list with delete button.
And the second method is delete(), which is used to delete data from database by using ajax, when you click on delete button in users listing.
Step 2: Add Route
Navigate to routes/web.php and update the following routes:
<?php
Route::get('users', 'UserController@users');
Route::post('delete/{id}', 'UserController@delete');
Step 3: Use SweetAlert On Blade View File
Now, Navigate to resources/views folder and create one blade view file that named users.blade.php file and update the following code into users.blade.php file:
<!doctype html>
<html lang="en">
<head>
<!-- Required meta tags -->
<meta charset="utf-8">
<meta name="viewport" content="width=device-width, initial-scale=1, shrink-to-fit=no">
<!-- csrf-token -->
<meta name="csrf-token" content="{{ csrf_token() }}">
<!-- Bootstrap CSS -->
<link rel="stylesheet" href="https://maxcdn.bootstrapcdn.com/bootstrap/4.0.0/css/bootstrap.min.css"
integrity="sha384-Gn5384xqQ1aoWXA+058RXPxPg6fy4IWvTNh0E263XmFcJlSAwiGgFAW/dAiS6JXm" crossorigin="anonymous">
<!-- jquery -->
<script src="https://cdnjs.cloudflare.com/ajax/libs/jquery/3.4.0/jquery.min.js"></script>
<!-- SweetAlert2 -->
<link rel="stylesheet" href="https://cdnjs.cloudflare.com/ajax/libs/limonte-sweetalert2/7.2.0/sweetalert2.min.css">
<script src="https://cdnjs.cloudflare.com/ajax/libs/limonte-sweetalert2/7.2.0/sweetalert2.all.min.js"></script>
<title>Use SweetAlert2 with AJAX in Laravel</title>
</head>
<body class="container" style="margin-top: 40px;">
<div class="row" style="margin-bottom: 20px;">
<div class="col-lg-12 margin-tb">
<div class="pull-left">
<h3>Users</h3>
</div>
</div>
</div>
<table class="table table-bordered">
<tr>
<th>ID</th>
<th>Name</th>
<th>Email</th>
<th width="280px">Actions</th>
</tr>
@foreach ($users as $user)
<tr>
<td>{{ $user->id }}</td>
<td>{{ $user->name }}</td>
<td>{{ $user->email }}</td>
<td>
<button class="btn btn-danger" onclick="deleteConfirmation({{$user->id}})">Delete</button>
</td>
</tr>
@endforeach
</table>
<script type="text/javascript">
function deleteConfirmation(id) {
swal({
title: "Delete?",
text: "Please ensure and then confirm!",
type: "warning",
showCancelButton: !0,
confirmButtonText: "Yes, delete it!",
cancelButtonText: "No, cancel!",
reverseButtons: !0
}).then(function (e) {
if (e.value === true) {
var CSRF_TOKEN = $('meta[name="csrf-token"]').attr('content');
$.ajax({
type: 'POST',
url: "{{url('/delete')}}/" + id,
data: {_token: CSRF_TOKEN},
dataType: 'JSON',
success: function (results) {
if (results.success === true) {
swal("Done!", results.message, "success");
} else {
swal("Error!", results.message, "error");
}
}
});
} else {
e.dismiss;
}
}, function (dismiss) {
return false;
})
}
</script>
</body>
</html>
Note that, after creating a blade view file, you need to include sweet alert libary on your blade view files:
<link rel="stylesheet" href="https://cdnjs.cloudflare.com/ajax/libs/limonte-sweetalert2/7.2.0/sweetalert2.min.css">
<script src="https://cdnjs.cloudflare.com/ajax/libs/limonte-sweetalert2/7.2.0/sweetalert2.all.min.js"></script>
And you can call sweet alert methods as follow:
//for success
swal("Done!", results.message, "success");
//for error
swal("Error!", results.message, "error");
Step 4: Run Development Server
Now, use the following command to run the development server as follow:
php artisan serve
After that, Open your browser and hit the below url on it:
http://localhost:8000/users