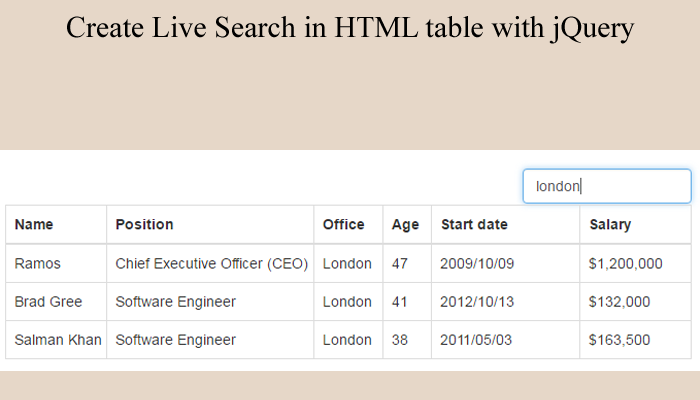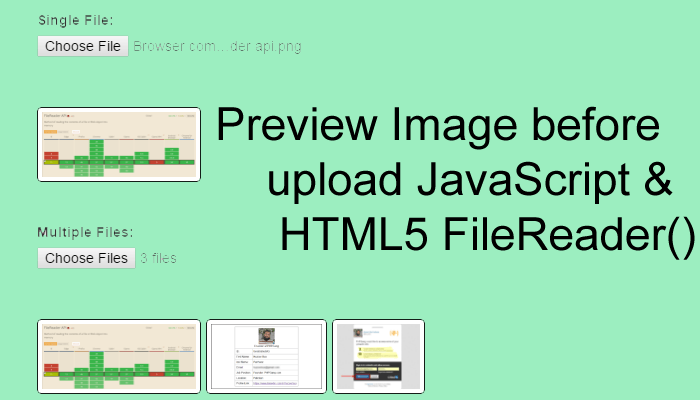
Show image before upload is a requirement of every web application to give good user experience. We published a tutorial that dose’t work in all browsers so, now I am going to give you this tutorial it will work on every browser which support HTML5 File API and JavaScript check compatibility of API here. I hope you like this tutorial as all other
First of all we need to know what is FileReader?
FileReader is an API of HTML5 used to interact local files. Example of its capabilities, the FileReader API could be used to create a thumbnail preview of images as they’re being sent to the server. You could use client-side logic to verify an upload’s file type matches its file extension or restrict the size of an upload etc.

Let’s start with HTML for single file show thumbnail
<input type="file" id="file" name="file" />
<span id="output"></span>
That above code show you a file uploader you can select 1 file at a time.
JavaScript code to show image thumbnails
<script>
function handleFileSelect(evt) {
var file = evt.target.files; // FileList object
var f = file[0];
// Only process image files.
if (!f.type.match('image.*')) {
alert("Image only please....");
}
var reader = new FileReader();
// Closure to capture the file information.
reader.onload = (function(theFile) {
return function(e) {
// Render thumbnail.
var span = document.createElement('span');
span.innerHTML = ['<img class="thumb" title="', escape(theFile.name), '" src="', e.target.result, '" />'].join('');
document.getElementById('output').insertBefore(span, null);
};
})(f);
// Read in the image file as a data URL.
reader.readAsDataURL(f);
}
document.getElementById('file').addEventListener('change', handleFileSelect, false);
</script>
That above JavaScript calls on change event of file element. This example can upload 1 file at a time for multiple files you can add a for loop as below.
<script>
function handleFileSelect(evt) {
var file = evt.target.files; // FileList object
// Loop through the FileList and render image files as thumbnails.
for (var i = 0, f; f = files[i]; i++) {
// Only process image files.
if (!f.type.match('image.*')) {
alert("Image only please....");
}
var reader = new FileReader();
// Closure to capture the file information.
reader.onload = (function(theFile) {
return function(e) {
// Render thumbnail.
var span = document.createElement('span');
span.innerHTML = ['<img class="thumb" title="', escape(theFile.name), '" src="', e.target.result, '" />'].join('');
document.getElementById('output').insertBefore(span, null);
};
})(f);
// Read in the image file as a data URL.
reader.readAsDataURL(f);
}
}
document.getElementById('file').addEventListener('change', handleFileSelect, false);
</script>
This will show you multiple files thumbnails after selection. for complete source code Download it and enjoy.
If you face any issue in its configuration please feel free to comment we love to help you.